Thursday, December 29, 2005

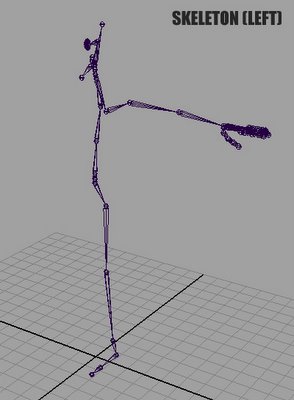
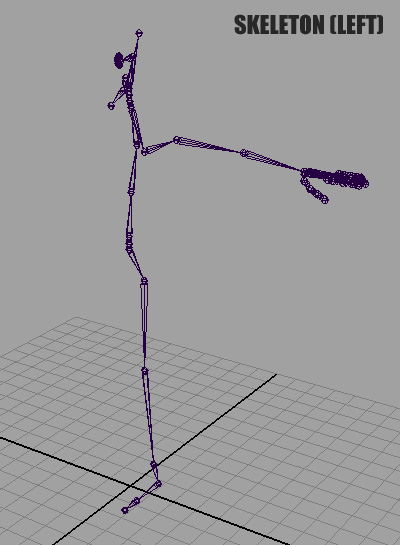
Create Skeleton Script Complete

The first stage in my "Order of Operations" is complete. I now have a Create Skeleton script which automatically generates and names all the joints on the left side of the skeleton.

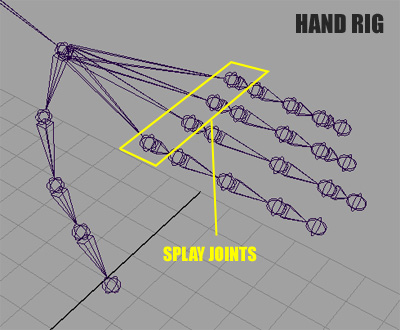
Of special interest are the Splay joints in the hand, this allows the fingers to splay outwards and inwards without interfering with the orientation of the fingers as they curl.
The Root of the rig allows the hips to travel downwards and the spine to travel upwards. The benefit of this is being able to rotate and translate the Hip independently wtihout interfering with the spine.
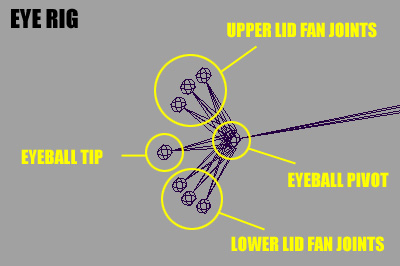
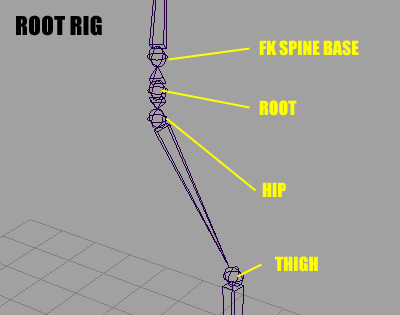
The Eye rig uses a series of fan joints for the upper and lower eyelids. This allows the eyelids to open and close without using a blendshape. The rotation of the eyeball is facilitated with the Eye pivot joint in the centre. The Eye tip is there simply to give better visual feedback when rotating the eye.

Wednesday, December 28, 2005

Order of Operations

I've given some thought to the various stages my rigging scripts will involve. Obviously, not all aspects of rigging can be automated. Joint placement is one stage where user interaction is required to get the joints placed just so. Control sizing is another area where it is important to have a user decide just how big the controls should be. Lastly, weight painting is still the black art its always been and requires a skilled painter to make the smooth binding bend correctly.

So here are the "Order of Operations", as I like to call them, for the automation of my rigging process:

  • Create Skeleton : This process is relativly automatic, with the script placing all the required joints in a generic configuration. This saves time and ensures all essential joints that other scripts expect are, infact, placed into the skeleton.
  • Joint Placement : This stage requires the user to move the joints into their desired positions.
  • Align Skeleton : This process is rather small, but very important. The knee and elbow joints are correctly aligned to the "invisible line" between the hip and ankle, and the shoulder and wrist, respectivly. This guarentees that the rotation of these joints is as true as possible, so that the legs don't bow when you lift the feet, and the arms don't twist unpredictably when the wrist is moved.
  • Orient Skeleton : This process involves orienting every joint in the body correctly, to ensure it rotates properly when animating. This goes double for any time Orientation constraints are used in the rig as they require that orientation be set correctly on the driving objects. Otherwise, driven objects will rotate unpredictably.
  • Mirror Skeleton : This process takes key segments of the skeleton, including the leg, arm, and eye joints, and mirrors them across the X axis. This ensures proper symetry in the skeleton, and all orientations are mirrored as well.
  • IK/FK Leg Setup : This process adds IK/FK blending, stretching, and twist joints to the legs of the skeleton.
  • IK/FK Arm Setup : This process adds IK/FK blending, stretching, and twist joints to the arms of the skeleton.
  • IK Spine Setup : Since we already have an FK spine in our skeleton, it is used as our basis for generating the stretchy IK spine. In this case, the term "IK" is used to describe the stretchiness, there isn't any actual IK or Spline IK used in this case.
  • Create Controls : This process creates and places all the key control objects onto the skeleton, but does not constrain them in preparation for the next process.
  • Control Placement : This stage allows the user the opportunity to tweak the controls by resizing them. The best way to resize controls without scaling the object is to, instead, select the CVs and scale them in Component Mode.
  • Control Binding : This process binds all the controls to the skeleton, adds any custom attributes necessary for the rig, and finalizes any connections that need to be made in order for the rig to be considered fully functional.

Saturday, December 24, 2005

Merry Christmas

Merry Christmas, Happy Holidays, and a Happy New Year to everybody!

Spine Script Complete

I've completed my MEL script which automatically generates a stretchy spine. The procedure allows for three inputs, the root joint, the tip joint, and the number of bones to lay inbetween. This allows the script to target an existing FK spine and create the stretchy joint chain along it.

It does this by first creating a Spline IK system along the FK joint chain, then deleting the IK handle since we really only want the curve the Spline IK system creates. PointOnCurve nodes are then laid down evenly along the curve, their distance apart determined by a percentage (1.0 devided by the number of joints specified, to be exact).

Empty groups are then created, the PointOnCurve nodes' Position attribute is fed into the groups' Translate attribute. This positions the groups in world space, allowing us to Point Constrain joints to them. Aim Constraints are used to orient the joints towards the next node above it in the chain.

Lastly, the CVs are queried in the curve and each CV is assigned a Cluster. The Clusters make it possible to move the CVs without having to drop down into component mode. It also makes it possible to move the CVs with constraints by constraining to the Cluster, because its not possible to constrain directly to a CV.

Thursday, December 22, 2005

Automatic Spine Setup

Having perfected my stretchy spine rig, I'm now faced with the challenge of scripting the entire process for my character kit. This will make setting up the spine a simple matter of positioning some the FK spine joints in the skeleton, then running the script. It will take those FK joints, create a curve along their path, drop PointOnCurve nodes along the curve, constrain and aim the bones to the nodes, and cluster the CVs on the curve so they can be hooked up to the control system later. This should turn a 45 minute manual rig job into a a 5 second push-button affair.

I'll be sure to document my findings as I proceed with this script, so far, all the individual parts that I've tested seem to work fine. Now, its just a matter of combining all those little tests into a single scripted procedure.

Tuesday, December 20, 2005

A Taste of Things to Come

The studio I work for recently won the bid to do a demo for a client involving four characters; three people (biped), and one animal (a quadroped, but with the ability to sit upright like a biped). Naturally, these will all need rigging, and this project allows for some development work in which I plan to amalgamate all of the latest rigging technologies I've been practicing.

These technologies include an IK/FK leg that can stretch in both IK and FK modes, optional twist joints, and the ability to seamlessly blend between the two systems with stretchiness, orientation, and twisting all staying intact. Likewise, the arms will feature the same IK/FK blending, the same stretchiness attributes for both IK and FK, and optional, but highly recommended, twist joints. Of course, translations along the joints, rather than joint scaling, will be used to produce the stretching.

The latest technology I've recently perfected is an Spline IK-style spine. I say "style" because it actually doesn't involve an IK solvers. Instead, a curve is created, and pointOnCurve nodes are generated along the curve and joints are then parented to, and aimed at, the various nodes to create a spine chain. The CVs on the curve are then clustered, constrained to controls, and voila, you have a stretchy spine system which is not only faster than Spline IK, but also more powerful. In my particular design, the spine is able to twist from the base or the top, while Spline IK is onl able to twist from the base of the spine.

To reduce the amount of re-rigging on the IK, FK and Blend joint chains, the hands, feet, and any other extranious joints will be parent constrained rather than parented directly. This also allows all the bindable joints for the smooth skinning to be grouped in the same location. This makes it a no brainer as to which joints should and shouldn't be bound since all will clearly be marked with a BIND tag in their name.

While it is possible to rig each character from scratch, I feel it will be a good idea to create a "character kit", a set of MEL scripts to automate many of the major steps in the process. This guarentees a greater degree of consistency, allowing any changes to the rig to be done more easily, and making the control system more predictable for the animators.

There's more to discuss, but I don't want to list it all at the moment, incase I don't have time to implement it all. This post has basically been a list of the key components I'm determined to include. Be sure to stay tuned as I develope this rig, I plan on posting videos of the various parts in action, along with brief summaries on how they were made.

Monday, December 19, 2005

Solutions for Gimbal Lock

Ah gimbal lock, every animator's nemesis. Gimbal lock rears its ugly head when you decide to rotate something in 3D space a little too much on all axes and it decides to stop playing nice and refuse to move in the directions you really want it to. Every animator has, at one point or another, pulled their hair out over a shoulder that won't pivot correctly, often having to manually key every single frame in order to force the arm to follow the arc they want.

Gimbal lock such as this is caused by two factors; the rotation order of the joint or object, and the order rotations that an animator has used to get the object into that position. Probably the worst case of gimbal lock I've ever experienced was when I was developing a vehicle rig for a car that needed to crash, flip over several times, roll, and spin on every axis. Gimbal lock was virtually inevitable.

I tried several possible solutions, including nesting the vehicle within several groups and given each group a different pivot, but that was scrapped because it was too difficult to manage the nested animation. Another solution was to use a series of parent constraints and "pass" the vehicle along the chain of constraints, rotating them to do the flips, rolls and spins. This solution was also scrapped because it turned out gimbal lock still happened on the vehicle because the constraints were simply changing the objects channels.

The best solution was to key the rotation order. Nearly every object in Maya that can be transformed has a hidden attribute called Rotation Order. Simply use the Channel Editor to make the attribute visible and keyable. Keying this allows you to adjust the rotation order on the fly, effectivly dodging gimbal lock. When your object approaches gimbal lock, you'll see the rotational axes begin to line up with eachother, which you can tell by looking at the rotation gimbal. If you need to make your object rotate in a different direction, simply key the rotation order attribute to an order that does allow rotation in the direction you need, again, this can be determined by simply looking at the rotation gimbal.

Something to keep in mind about keying the rotation order, Maya doesn't like when the drop down menus are used in the channel list for some reason. The drop down list represents values of 0, 1, 2, 3, etc. But if you try to change the order and key it using the drop down menu, you'll notice the value jump suddenly to 6000 or some other outrageously high number. So in order to bring that value back down into the range of the drop down list values, you have to open the graph editor and manually bring the keyframe back down to the single digit range. A simple MEL script can be written to do this sort of thing for you with the click of a button.

One of the drawbacks to keying the rotational order rears its head during rendering. 3D motion blur relies on the rotation information of an object to accuratly predict the path of the blur. Changing the rotation order will cause the blur to glitch momentarily in the wrong direction. The simplest solution to this is to simply bake your animation down to the verticies, removing the rotations, and instead translating verts, effectivly morphing the object from frame to frame. Just make sure you save out a new version of your animation before baking it.

Sunday, December 18, 2005

Stretchiness, Scaling vs Translating

I recall a while back reading a forum which Goosh frequented where people were asking about stretchy limbs, discussing various techniques using joint scaling to make a leg or an arm grow longer. Goosh mentioned that he prefered translations over scaling, and that got me thinking.

First, I understood why he harshed on scaling. The problem with scaling joints is that they work well for anything skinned below the joint stretching it along the bone, but anything above the joint gets stretched backwards. This can be detrimental in areas such as the pelvis where the leg joins up with the hip. If you were to use scaling on the leg joints, any smooth weighting you might have above the pelvis joint will invert, pushing the skin up into the character ever so slightly. The more weight in that area, and the more scaling the joint does, the more it will invert, which can become quite noticable on very cartoony characters.

Second, I wondered what he even meant when he said translations. Did he mean using expressions to drive the world position of the joints, or perhaps using point constraints or parent constraints to wrangle the joints into the positions he wanted. After pondering this for a while I realized that he meant local translations down the joints. You'll notice that whenever you create a joint chain, each child joint has a translation offset, and you can't use Freeze Transformations to remove this offset either. This offset is what tells each child joint how far away from its parent it is. One thing to note about these offsets, in order to unify the offset into a single Translate channel, you MUST ORIENT THE JOINTS FIRST. Doing so will ensure that one of the local axis point down the joint, which is also the direction you want the joint to stretch in.

Using this offset, we can can simulate the effect of scale without the negative effects of the skin inverting above the joints. How? By piping our stretch percentages into the translate channels rather than the scale channels. Sounds pretty simple, but there's a drawback. Scaling works on the fact that it has an original size, and adjusting the scale is simply increasing or decreasing the size of the joint by a factor of that orginal size. Basically, scaling remembers how big it was.

The problem with this is that if you were to pipe the precentage values into the translate channels, when the joints arn't stretched at all, their percentage is zero. This would, in turn, set all the local translation offsets of the child joints to zero. The result being is that all your joints wouldn't be offset, they'd be all overlapping eachother at their local origins.

One of the easiest solutions I've found is to create a custom attribute for each of the joints you plan to stretch and call it "Original Length" or something to that effect. This attribute would be used to store a copy of, what else, the original length, aka: the translate value. You can then multiply the original length by your incoming stretch percentage and pipe that into your translate channel on your joints.

This was a real eye-opener when I first figured it out, I hope it helps anyone out there having to build a stretchy rig. There are lots of options for this sort of thing, and I've found the translation approach works best.

The Future of Maya

While I'd like to keep this blog more informative than opinionated, this topic is worthy of a post. There's a lot of speculation in the industry as to what may or may not happen to Maya and 3D Studio Max now that AutoDesk has bought both packages.

I believe that both packages will continue to be developed, since Max dominates the games market, and Maya dominates the television and film market. Both have their devoted followings, for instance animators often prefering the speed and response of Maya, while modellers prefer the robust modelling tools found in Max.

Obviously, there is the possibility that the two packages could be combined into a single uber-package. Who knows, this may eventually happen, although carful attention would need to be paid to ensure that it wasn't just two seperate pieces of software slammed together with the developers blindly hoping for the best. This sort of thing would require the development of a totally new paradigm for how the software is organized, going beyond both the Stack system in Max and the Node system in Maya.

This sort of undertaking would go far beyond the deadlines of the usual release cycles for Maya and Max, and would therefore not be a blanket replacement for either package. It would be many years in development before we ever see it come to fruition, assuming its even in the works. So until that time, if it ever comes, Maya and Max will probably still be developed as seperate packages, but I expect to see a lot more feature sharing in the coming releases. Take, for example, the full body IK systems in Maya 7 which were incorporated from MotionBuilder when Alias bought it out. Hopfully we'll see some of the modelling tools from Max make there way into Maya, and some of the speed and efficiency we see in Maya make its way into Max.

This is what I believe anyways.

The Art of Rigging, Volume 2 Released

CG Toolkit has just released their second installment in the excellent Art of Rigging series. Volume 1 of this series was a breath of fresh air as far as technical publications are concerned. Their look was sleek and stylish, but their approach was down to earth and even fun to read. They manage to painlessly demystify a good deal of problems nearly every student or technical director runs into when constructing a rig. The DVD it came with covered most of the book's major topics in easy to digest video tutorials. There were well over 9 hours of tutorials crammed full of invaluable information and practical solutions.

Now that Volume 2 is out, the focus has shifted from simply rigging to a broader technical standpoint. As many have found, a rig cannot survive on its own, it needs a 3d mesh to skin to, textures to make it look pretty, a scene to be placed in, animation to give it life, and rendering to meet that footage deadling. Volume 2 deals with pipelines, the critical organization of at studio and how one department interacts with another. They delve into the aspects of a multi-resolution pipeline, allowing animators to animate a low res proxy character and eventually translating that animation to a super high res character that most computers would have a hard time even getting maya to load without crashing.

This book takes the refined rigging process of volume 1, then takes a step back to begin to include all the other aspects of a production pipeline necessary to make that rig useful.

I'd highly recommend both these books and believe that they should be an essential resource on every technical director and 3d teacher's shelf.

First Post

Greetings, my name is Ian, I'm a technical director for an animation company in Toronto, Ontario. A big part of my job is character rigging in Maya, the process of setting up a skeleton and control system for a character, and skinning, the process of binding the static 3d model to the skeleton so that it can move. In other words, a modeller carves the puppet, I give it hinges and strings, and an animator makes it dance.

Recently a number of small projects have begun at the studio and I've found myself doing a lot of rig development. My colleagues seemed quite interested (the ones who were riggers and character developers were anyways) so figured there's at least a small audience for this sort of thing. This blog will chronicle my rigs, rig components, skinning, and scripting.

So for all of you out there who are budding technical directors, students struggling with your character rigs, or hobbiests who just want to make something move, bookmark this blog, pronto.