Monday, February 26, 2007

Utilities

On my most recent project I've finally had time to start compartmentalizing my MEL procedures into handy, recyclable utility files. I've now got a whole library of simple commands I can use to parse, build and manipulate strings, search for objects, get and set values in my user interfaces, manipulate arrays, etc.

Probably one of the biggest hurdles is how to create this library of procedures without having to worry about the command names overlapping eachother, or worse, overlapping Maya's internal command names. To solve this I've gone about simulating namespaces on my procedures and variables. I first prefix everything with my name, then a word in all-caps to indicate what library it belongs to.

Examples:
Ian_UI_GetControlType()
Ian_STRING_CountWords()
Ian_ARRAY_DeleteAt()

While it does get tedious having to type out prefixes constantly, its a safe way of guarenteeing that your code stays relativly futureproof.

Saturday, February 10, 2007

Layer List

On our latest 3D production in the studio, we've been using an extensive referencing system to bring in all characters, props and backgrounds. Each character has between 3 to 5 display layers associated with it; one for controls, one for joints, one for geometry, etc. This allows one character's controls to be hidden while working on another character so the two don't get confused.

The problem is, nearly every element has at least one layer. This means that when 6 characters are in a scene with the background and props, the layer count exceeds 200 layers. Trying to manually sort through these to hide unnecessary layers can be tedious and frustrating.

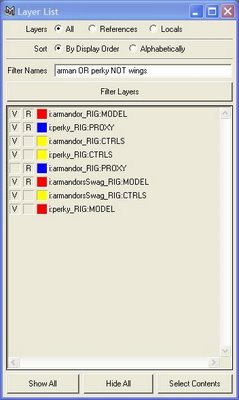
To solve this problem, I created a floating layer window which replicates a lot of the built in layer list functionality. You can hide and unhide layers, change to template or reference states, and see the layer colours. The functionality that goes beyond the default layer panel is what really makes it useful.


You can filter layers based on whether they're references or local layers, making it easy to bring user created layers in animation files into view. You can sort the layers by display order or alphabetically. You can easily select layer contents by double clicking on any layer. But most impressive is the boolean search filter. You can use simple AND, OR, NOT operators to filter the layer names. For example: "cecil NOT marge" or "cecil OR marge NOT kitchen"

Lecture Complete

My rigging lecture at Algonquin College in Ottawa is finished. I spent two full days explaining rigging techniques and addressing issues students had with their own rigs. Some of the topics we covered were joint orientation techniques, IK/FK switching, creating proxy meshes, smooth skinning and blendshapes.

Like most people new to rigging, the students were apprehensive at first, but soon they were understanding and asking lots of questions. My goal was to give them insight into what a real production rig would be like and I think I accomlished that. I'm looking forward to being invited back to lecture next year.

Wednesday, January 31, 2007

Rigging Lecture in Ottawa

A friend of mine, who was in the same 3D animation course that I took in college, has recently become an animation teacher herself. What's more, she's asked me to come to Ottawa to do a 2 day rigging lecture at Algonquin College.

This means I'll be spending a good deal of my spare time in the next two weeks brushing up my techniques, preparing class materials, and making sure I can fit it all into about 16 hours of class time. At the moment I'm brainstorming an itinerary with all the topics I'd want to teach. From there I'll filter it down to the most essential elements.

What I'm happiest about is that I'll be able to teach some real-world approaches. Hopfully it will give the students an idea of what industry rigging is like. I plan to only show techniques that I specifically use in the studio, and to not dilute them by trying to include ones I don't use. I figure that if I were a full time teacher, I'd try to cover a broader range of topics, but this lecture will be designed to be a "field tested" approach.

Sunday, January 28, 2007

Selection Sets Script

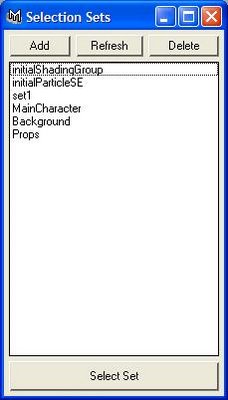
Selection sets are handy when working with complex scenes, but they can be frustrating to use when switching from one selection to another. This is because sets are listed in the outliner and requires several clicks to select the objects within a set.

I've created a script which displays a list of selection sets and automatically selects the set when you click on it. It also allows you to easily create and name new sets and delete old or unnecessary ones.

Hierarchy Animation Importer and Exporter

There are several common problems in 3D animation which come about on a daily basis when working in a studio with teams of animators; reuse, recovery and renaming.

Reuse is simply the ability to create a library of common animations (walkcycles, runcycles, etc.) and poses (rest pose, leaning pose, etc.). This is especially crutial for quickly copying poses from the end of one scene to the beginning of the next in order to produce a clean hookup.

Recovery is in any of those situations where the animator accidentally breaks their scene file and requires the animation from it be salvaged and placed into a new scene file. This same principle is common when transfering animation from a low res character rig to a high res character rig.

Renaming deals with the fact that during a production if references are being used, or frequent updates are being made to character rigs in parallel, animation is going to need to be transfered from rigs with different naming on the controls. The only way to map the controls of controls with different names is by using their hierarchy structure.

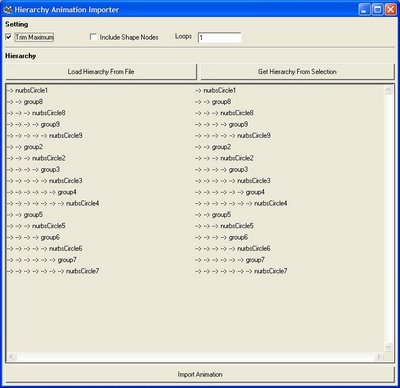
I've developed a solution to all these problems. Its a pair of MEL scripts, one for exporting animation, the other for importing it. They use hierarchy structure rather than node names to store the animation. This allows characters with different naming conventions, and to a limited degree, different hierarchies, to transfer animation.
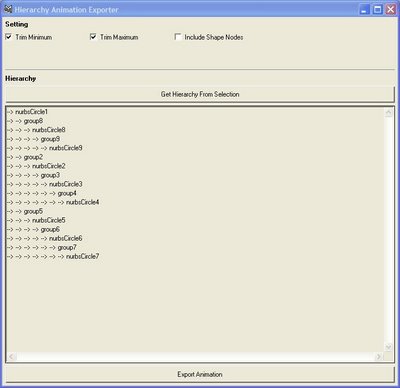
The scripts have a set of powerful features which include the ability to trim animation clips with the ranger slider, include or exclude shape nodes from being analyzed, animation looping. Every aspect of an objects animation can be stored and restored including its locks, tangent types and tangent weights.
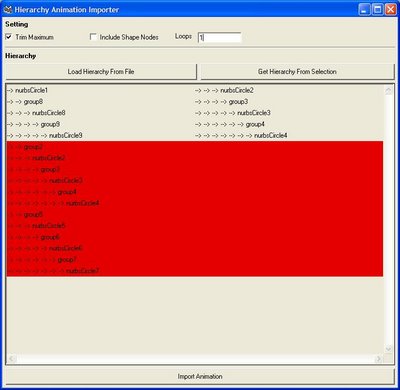
When hierarchies don't match, the regions that differ are highlighted in the lists in red for easy identification.
This has been an incredibly extensive project that I've spent months working on, mostly in my spare time. Now that the studio finally has some 3D projects, its going to be interesting to see how these scripts fare with daily use in the field.
Been a While

I havn't posted in almost a year now. The 3D demo I was rigging on last winter got a little out of hand and I wound up having no time to continue posting. The demo was finally complete but the studio I work for has mostly been doing Flash productions for the past year. I've been doing a combination of animation and JSFL scripting for Flash in this time.

Recently, several 3D projects have been picked up by the studio, so I've finally been able to continue rigging and scripting for Maya. It will all be done in Maya 8.5 so we'll see how that goes.

Thursday, December 29, 2005

Create Skeleton Script Complete

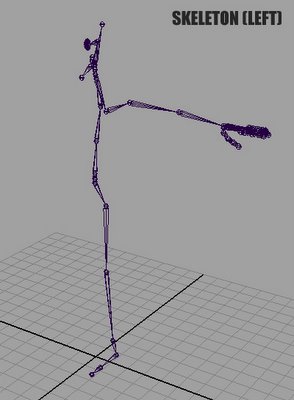
The first stage in my "Order of Operations" is complete. I now have a Create Skeleton script which automatically generates and names all the joints on the left side of the skeleton.

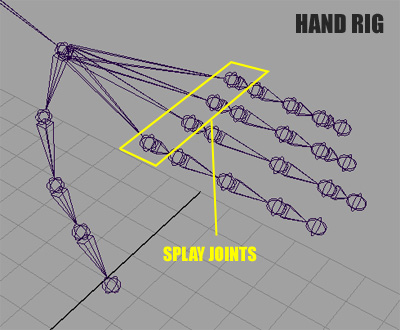
Of special interest are the Splay joints in the hand, this allows the fingers to splay outwards and inwards without interfering with the orientation of the fingers as they curl.
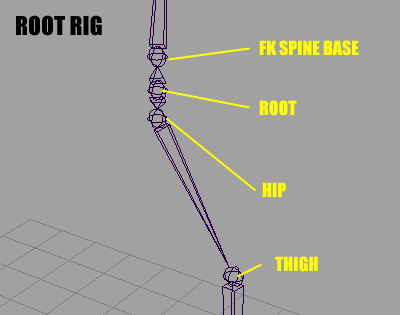
The Root of the rig allows the hips to travel downwards and the spine to travel upwards. The benefit of this is being able to rotate and translate the Hip independently wtihout interfering with the spine.
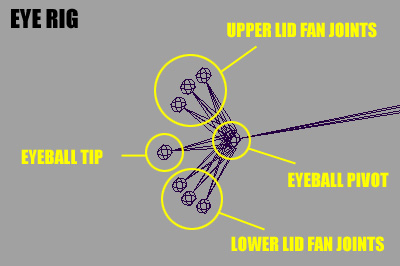
The Eye rig uses a series of fan joints for the upper and lower eyelids. This allows the eyelids to open and close without using a blendshape. The rotation of the eyeball is facilitated with the Eye pivot joint in the centre. The Eye tip is there simply to give better visual feedback when rotating the eye.

Wednesday, December 28, 2005

Order of Operations

I've given some thought to the various stages my rigging scripts will involve. Obviously, not all aspects of rigging can be automated. Joint placement is one stage where user interaction is required to get the joints placed just so. Control sizing is another area where it is important to have a user decide just how big the controls should be. Lastly, weight painting is still the black art its always been and requires a skilled painter to make the smooth binding bend correctly.

So here are the "Order of Operations", as I like to call them, for the automation of my rigging process:

  • Create Skeleton : This process is relativly automatic, with the script placing all the required joints in a generic configuration. This saves time and ensures all essential joints that other scripts expect are, infact, placed into the skeleton.
  • Joint Placement : This stage requires the user to move the joints into their desired positions.
  • Align Skeleton : This process is rather small, but very important. The knee and elbow joints are correctly aligned to the "invisible line" between the hip and ankle, and the shoulder and wrist, respectivly. This guarentees that the rotation of these joints is as true as possible, so that the legs don't bow when you lift the feet, and the arms don't twist unpredictably when the wrist is moved.
  • Orient Skeleton : This process involves orienting every joint in the body correctly, to ensure it rotates properly when animating. This goes double for any time Orientation constraints are used in the rig as they require that orientation be set correctly on the driving objects. Otherwise, driven objects will rotate unpredictably.
  • Mirror Skeleton : This process takes key segments of the skeleton, including the leg, arm, and eye joints, and mirrors them across the X axis. This ensures proper symetry in the skeleton, and all orientations are mirrored as well.
  • IK/FK Leg Setup : This process adds IK/FK blending, stretching, and twist joints to the legs of the skeleton.
  • IK/FK Arm Setup : This process adds IK/FK blending, stretching, and twist joints to the arms of the skeleton.
  • IK Spine Setup : Since we already have an FK spine in our skeleton, it is used as our basis for generating the stretchy IK spine. In this case, the term "IK" is used to describe the stretchiness, there isn't any actual IK or Spline IK used in this case.
  • Create Controls : This process creates and places all the key control objects onto the skeleton, but does not constrain them in preparation for the next process.
  • Control Placement : This stage allows the user the opportunity to tweak the controls by resizing them. The best way to resize controls without scaling the object is to, instead, select the CVs and scale them in Component Mode.
  • Control Binding : This process binds all the controls to the skeleton, adds any custom attributes necessary for the rig, and finalizes any connections that need to be made in order for the rig to be considered fully functional.

Saturday, December 24, 2005

Merry Christmas

Merry Christmas, Happy Holidays, and a Happy New Year to everybody!

Spine Script Complete

I've completed my MEL script which automatically generates a stretchy spine. The procedure allows for three inputs, the root joint, the tip joint, and the number of bones to lay inbetween. This allows the script to target an existing FK spine and create the stretchy joint chain along it.

It does this by first creating a Spline IK system along the FK joint chain, then deleting the IK handle since we really only want the curve the Spline IK system creates. PointOnCurve nodes are then laid down evenly along the curve, their distance apart determined by a percentage (1.0 devided by the number of joints specified, to be exact).

Empty groups are then created, the PointOnCurve nodes' Position attribute is fed into the groups' Translate attribute. This positions the groups in world space, allowing us to Point Constrain joints to them. Aim Constraints are used to orient the joints towards the next node above it in the chain.

Lastly, the CVs are queried in the curve and each CV is assigned a Cluster. The Clusters make it possible to move the CVs without having to drop down into component mode. It also makes it possible to move the CVs with constraints by constraining to the Cluster, because its not possible to constrain directly to a CV.